
Our A to Z of Wide Format – B is for Bleed
Applications, Bleed, RIP Software…. We get asked lots of questions about the world of Wide Format on a daily basis. At Signmaster we are here to help and our lovely team of experts have pulled together a handy A to Z guide answering the most frequently asked questions.
Introducing the Signmaster A to Z of Wide Format
This is a series of helpful blogs, guides and articles that we hope you will find useful. We will post a new blog every fortnight and we’d love to know what you think so please comment or drop us an email. We’d love to hear from you!
This week we turn our attention to B….

B is for Bleed
Another frequently asked question we get is what is bleed and does it apply to wide format printing?
Here our print room manager Gary, explains all.
Bleed is the term used for artwork that is printed beyond the trim edge of the print, to ensure it extends to the edge of the page after it has been trimmed and applies to traditional printing and wide format printing.
As there is a degree of movement when printing/trimming, you should always create a 3mm bleed on all edges where bleed is required. Supplying your job to your printer without bleed may result in white lines when it is trimmed, we know we have been there!
The general rule for bleed is 3mm on all sides, although you can add more if required (particularly for complex jobs) but it can be an unnecessary use of ink and material so something to bare in mind when preparing your artwork.
This is also applicable to print and cut artwork (but not cut only) as plotters can have a small degree of movement when plotting artwork. Including the bleed will ensure that your design extends to the edge of the finished product as per your client’s requirements.
How to apply bleed
Thankfully the method of applying bleed is the same for all design programmes. You need to extend the object box, whether picture or colour, out past the edge of your page. Then, when creating the PDF, you need to set your bleed margins to 3mm.
This needs to be modified slightly for print and cut artwork as the bleed needs to be extended round the individual elements that are being plotted past the contour cut lines.
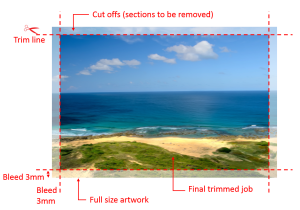
Bleed illustration for print only artwork
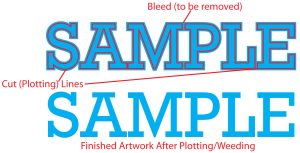
Bleed illustration for print and cut artwork
We hope you found this article useful and if you have any other wide format print questions we’d love to hear from you.
RECENT POSTS
Subscribe to our Blog
SEARCH


Head Quarters & Northern Office
Unit 3
Waymills Industrial Estate
Whitchurch
Shropshire
SY13 1TT
UK
- Head Quarters: 01948 662669
